Drawing Genealogy Graphs. Part 1: Tree Drawing Using Reingold-Tilford Algorithm
Pavlo Myroniuk February 02, 2026 #algorithms #tree-data-structure #data-structures #typescript #drawing-genealogy-graphs-seriesMotivation
Last year, I started my own genealogy research. Honestly, I planned to start it many years ago. One day in 2025, I realized that if I did not start, then it may never happen, and I would lose a huge part of my family history.
I spent a lot of time visiting my old relatives and asking them many questions, and scanning old photos and documents. At some point, I questioned myself about how it's better to store all this data. Some day, I will write a detailed post about the approaches considered, the pros and cons of each, and why I chose what I did. But today, in this post, I am going right to the solution.
I chose Obsidian as a main app for storing all genealogy data, including photos, conversation recordings, text, people's information, scanned documents, etc. I wanted to have full control over my data. I did not want to trust any websites. Obsidian is very flexible, convenient, and extendable. For me, it's a perfect choice. Additionally, I periodically back up genealogy data to an external SSD and Google Cloud Storage bucket. I do not know about you, but I feel pretty comfortable and reliable with this approach.
Let me answer one question before we go further. Yes, I know about myheritage. I still fill in all the basic info for my family and ancestors, like names, birth, marriage, and death dates. I consider MyHeritage a great tool for research. But again, I do not trust it, and I do not want to entrust it with all my family's personal photos, stories, some documents, and other sensitive information.
So, where did I stop? Oh, yes, Obsidian. Obviously, I would want to visualize the family graph. The Obsidian has a built-in Graph View. It looks funny, but it doesn't even look close to what I want. I browsed the community plugins and did not find anything helpful. So, I decided to write my own Obsidian plugin that will render family members as a pretty graph. Plugin details are out of the scope of this article. I will definitely write a separate post about it in the future.
This article is focused only on the nodes positioning algorithm.
All tree diagrams were made using tldraw.
Intro
I knew that calculating node positions during graph or tree drawing is not a trivial task, and it would definitely be hard. But I still decided to try to solve this task by myself. I spent a few days on it without achieving any results. Then I googled for existing algorithms (yes, I should have done it before spending a few days on nothing).
I did not find the exact algorithm, but I found a similar (and much simpler) one: the Reingold-Tilford Algorithm for rendering pretty trees. This algorithm is not suitable for me because it is for tree node positioning. But all family relationships are a (complex) graph. This fact introduces a lot of complexity to the task, but I decided to implement the simpler version first and then improve it to meet my requirements.
But why write one more post when other explanations exist? The problem with existing explanations is that they explain every step of the algorithm as it is, but do not explain WHY it works and WHAT THE PURPOSE of each step of the algorithm is. Many posts feel like the code, but converted to English words 😔.
UDP. During writing this post, I found another post with a great explanation and even animations: Drawing Trees Functionally: Reingold and Tilford, 1981.
The Reingold-Tilford Algorithm
Let's go straight to the point. Our task is to calculate x and y coordinates of each node in our tree.
Every node in the tree can have any number of children.
Different implementations use similar (maybe a bit different) Aesthetic Rules for tree rendering. Usually, they look like this:
- Nodes at the same level of the tree should be on the same horizontal line.
- A parent should be centered over its children.
- A tree and its mirror image should produce drawings that are reflections of one another; Moreover, a sub-tree should be drawn the same way regardless of where it occurs in the tree.
Note 1. Someone also requires the distance between children of the node to be the same, but it's not the case for me. I do not care about this distance 🙃.
Note 2. There is a special rule for binary trees:
A left child should be positioned to the left of its parent node and a right child to the right (only applicable to binary trees)
The family tree of direct ancestors is, in fact, a binary tree; the explanation below assumes that any node can have any number of children.
It's easy to satisfy the first condition: the y coordinate is a recursion depth (node level in the tree) multiplied by (node height + gap between nodes).
const y = level * (NODE_HEIGHT + NODES_GAP);The real problem is the x coordinate assignment.
Because any node in the tree can have any number of children, we cannot know in advance the exact tree layout and node positions.
In other words, we cannot assign x coordinates with just one tree traversal.
Fortunately, we can do it in two traversals 😉. I call them the first walk and the second walk.
During the first walk, we calculate intermediate (preliminary) preX, mod, and shift values.
During the second walk, we use these values to calculate the final x coordinate.
Because it is just two tree traversals, the overall algorithm complexity is O(n) where n is the number of nodes in the tree.
Suppose we have the following tree:
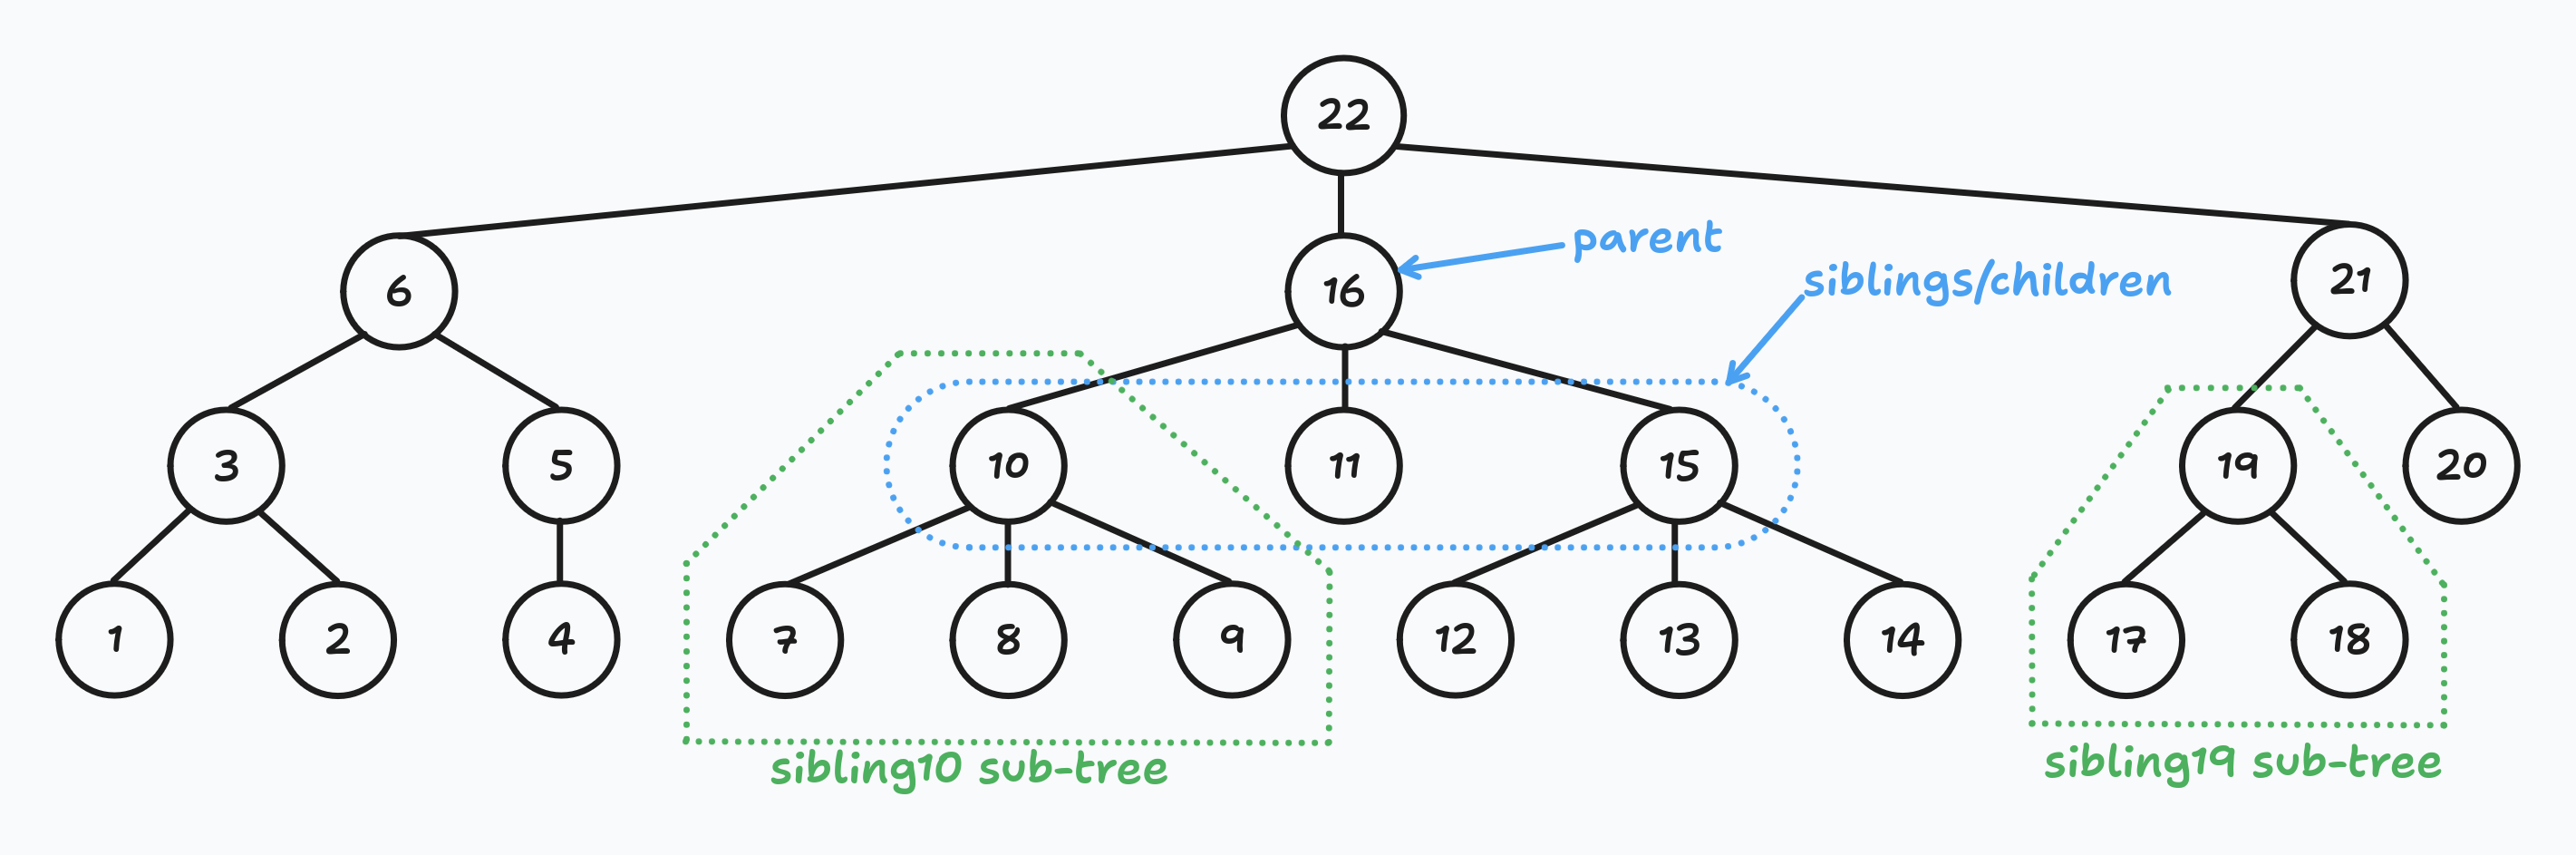
Let me clarify a few things.
- Siblings are all nodes that share the same parent node. I do not often see this term used, so I decided to clarify it.
- Sub-tree of the node is all descendants, including the node itself. For example, the subtree of node 10 consists of nodes 10, 7, 8, and 9.
- The Reingold-Tilford Algorithm uses a depth-first tree traversal. In the picture above, you can see in what order the coordinates will be assigned. It is important to determine the siblings' order. Each time we traverse the tree, we should visit nodes in the same order. In the picture below, I drew arrows that show the nodes visiting order:

First walk
As I wrote above, during the first walk, we determine preX, mod, and shift values for each node in the tree.
Let me explain what these parameters mean.
preXor preliminary x. The initial nodexcoordinate was given based on its position among siblings. ThispreXvalue does not take into account siblings' sub-trees or children's sub-trees.modor modifier. Denotes how much we need to shift node descendants (but not the node itself) to the right to make descendants centered with respect to the node.
shiftor shift 🤣. Denotes how much we need to shift the node and its descendants to the right to avoid overlapping with the previous sibling sub-tree.
Worth mentioning that the original paper does not have the shift parameter, only preX and mod.
The shift parameter was introduced in this post for better clarity: Reingold Tilford Algorithm Explained With Walkthrough. Sep 12, 2023.
I also follow this approach because I've gotten used to this parameter, and it's easier to understand that way.
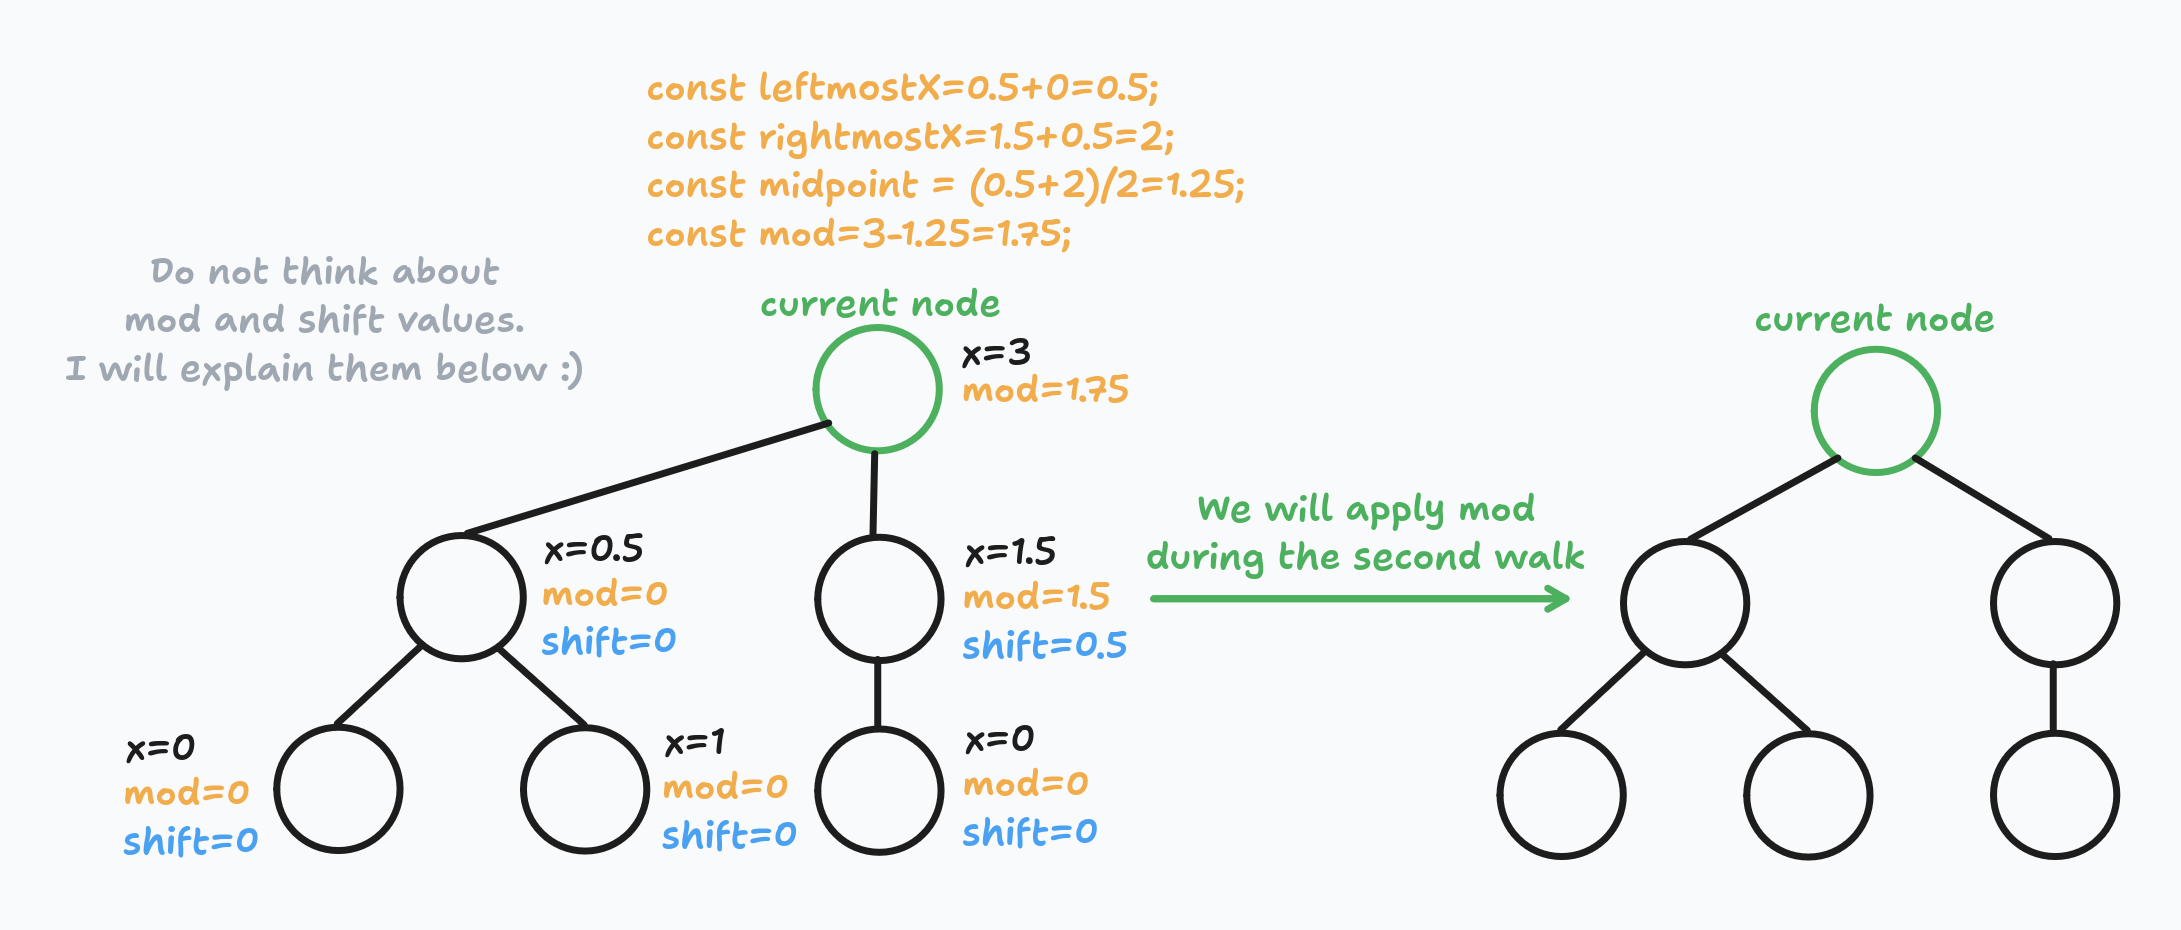
Preliminary x
As I wrote above, preX is the initial node x coordinate we gave it based on its position among siblings.
The distance between nodes must be at least NODE_WIDTH + NODES_GAP. Let's call it a sibling distance.
For the example's simplicity, I assume that the sibling distance is equal to 1:

Almost at the end of writing this article, I realized it would be easier to set sibling distance to 2. But I did not want to recalculate all numbers, so I left it as it is.
For every node, we set the preX to one of the following values:
- If the node is the leftmost node among siblings, then its
preXis equal to the midpoint of its children:
If the node does not have children but is the leftmost sibling, then itsconst leftmostX = leftmostNode.preX + leftmostNode.shift; const rightmostX = rightmostNode.preX + rightmostNode.shift; const midpoint = (leftmostX + rightmostX) / 2;prexis equal to0. - If the node is not the leftmost node among siblings, then its
preXis equal to the previous siblingpreXplus sibling distance.const preX = prevSibling.preX + SIBLING_DISTANCE;
Wait!!! What?
.shift? Here? Why?
Calm down! 😇
Yes, shift. Do you remember the shift definition?
Denotes how much we need to shift the node and its descendants to the right to avoid overlapping with the previous sibling sub-tree.
The shift value also affects the node x value.
We need to take it into account when calculating preX.
But we do not use the children's mod value because it does not affect the children x value (only children's descendants).
Yes, you do not know how the shift is calculated, but I assure you, I will explain it below.
As noted above, the Reingold-Tilford algorithm is a depth-first recursive algorithm.
It means that when we calculate node preX, mod, and shift values, these values are already calculated for all child nodes.
Modifier
At this step, our goal is to center children with respect to their parent node. Currently, only children of leftmost siblings are centered with respect to their parent node. We need to do the same for all other nodes.
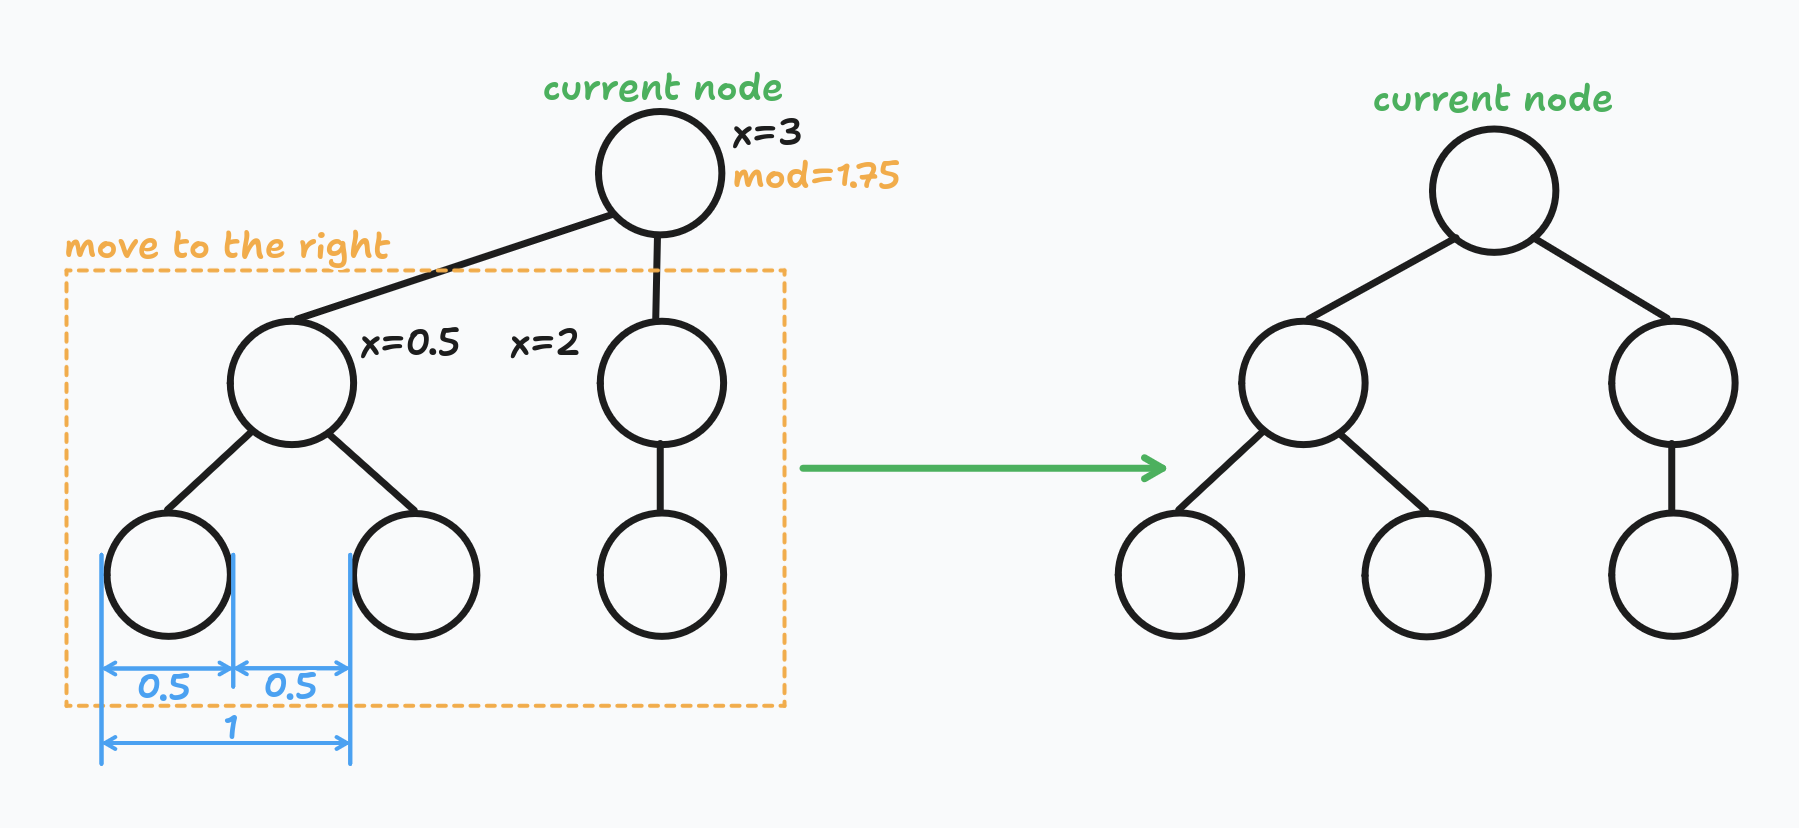
For every node, we calculate the mod value: the distance between the children's midpoint and preX.
Or, in other words, how much we need to shift descendants to the right, so they are centered with respect to their parent node.
The general formula looks like this:
const leftmostX = leftmostNode.preX + leftmostNode.shift;
const rightmostX = rightmostNode.preX + rightmostNode.shift;
const midpoint = (leftmostX + rightmostX) / 2;
const mod = node.preX - midpoint;Here is an example of how it will look on a real tree:
Do not think about the child's shift value. I will explain it below.
Good. Now all children are centered with respect to their parent node.
Obviously, that's not enough.
All previous manipulations do not prevent overlaps. We do not want sub-trees to overlap.
We are going to fix it using the shift parameter.
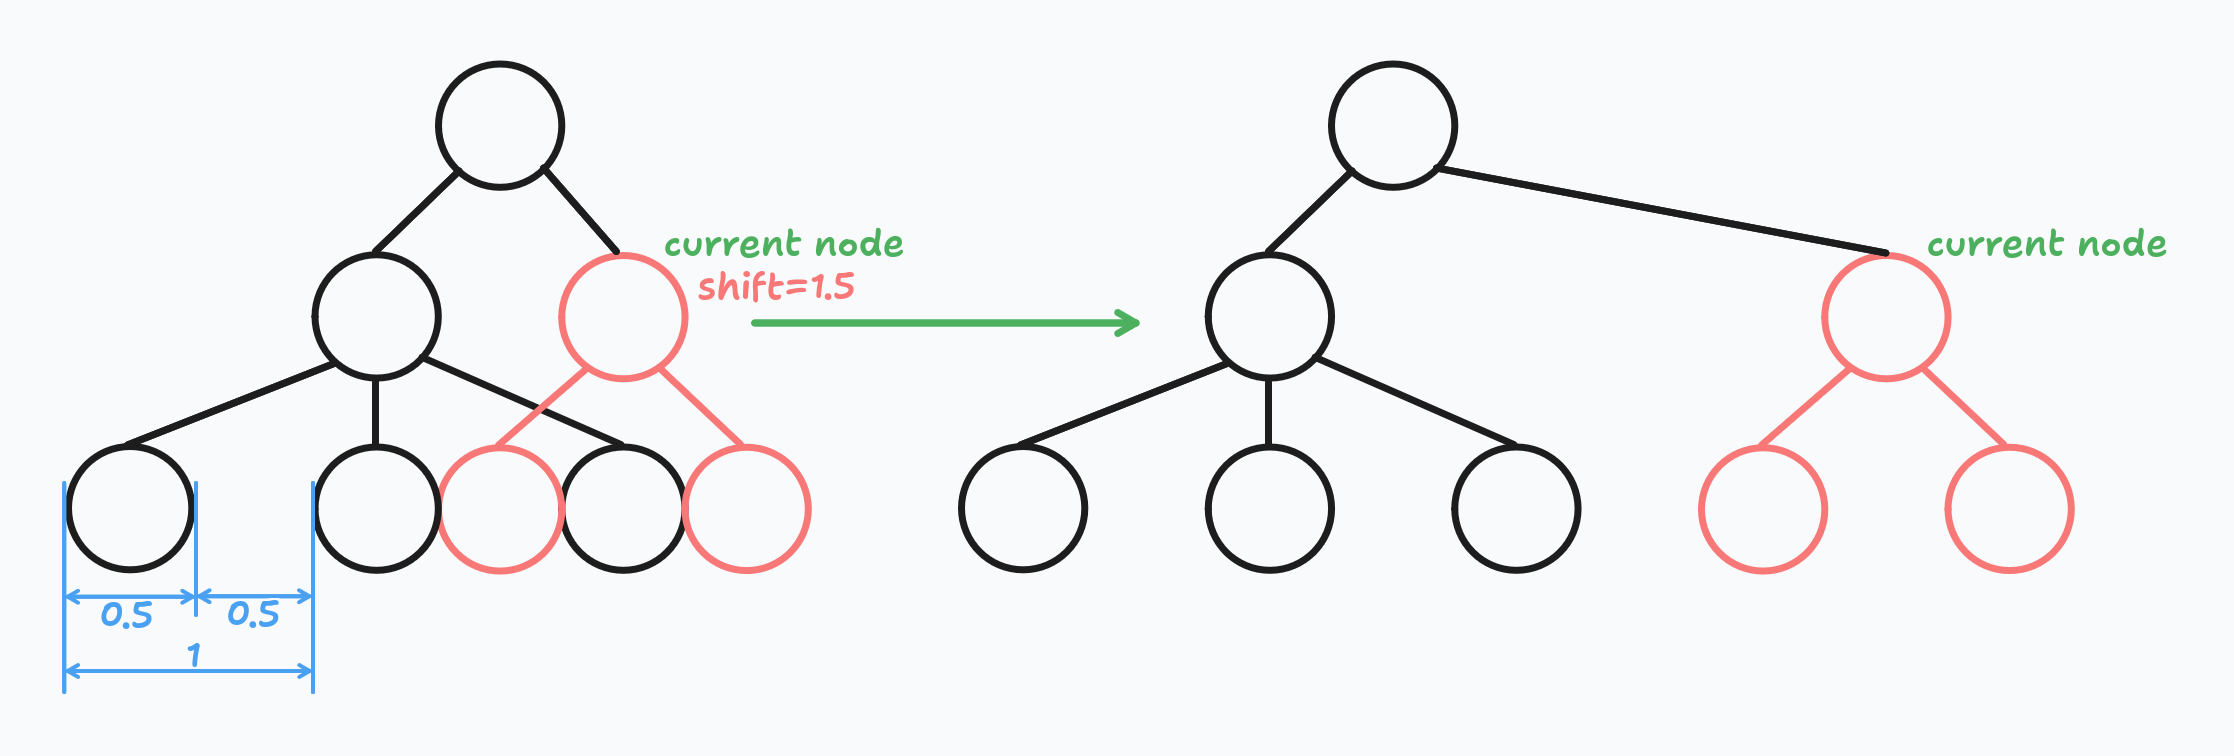
Shift
The mod parameter is responsible for parent-children alignment.
Whereas the shift parameter is responsible for eliminating overlaps.
If the current node is the leftmost node among its siblings, then its shift value is 0.
It's pointless to search for overlaps because there are no sub-trees to the left (in the scope of sibling sub-trees, of course).
If the current node is not the leftmost node among its siblings, then there is a possibility that its sub-tree overlaps with one of the sub-trees of siblings to the left.
We need to check for overlaps and increase the shift value if needed.
For every sibling's sub-tree to the left, we do the following: we compare x coordinates of the rightmost node of the left sub-tree and leftmost node of the right sub-tree (current node sub-tree) on each level.
If we detect that nodes overlap, we calculate how much we need to shift the right sub-tree. We do that on each level and, as a result, we take the maximum shift value. The shift calculation algorithm is pretty simple:
// Pseudocode.
// leftNode - rightmost node from the left sub-tree.
// rightNode - leftmost node from the current (right) sub-tree.
// leftShift - the sum of parents' mod and shift parameters for leftNode.
// rightShift - the sum of parents' mod and shift parameters for rightNode.

const leftX = leftNode.preX + leftShift + leftNode.shift + NODE_WIDTH;
const rightX = rightNode.preX + rightShift + rightNode.shift;

let shift = 0;
// If the distance between sub-trees is not big enough.
if (rightX - leftX < NODES_GAP) {
    // Calculate needed shift.
    shift = NODES_GAP - (rightX - leftX);
}
See the example:
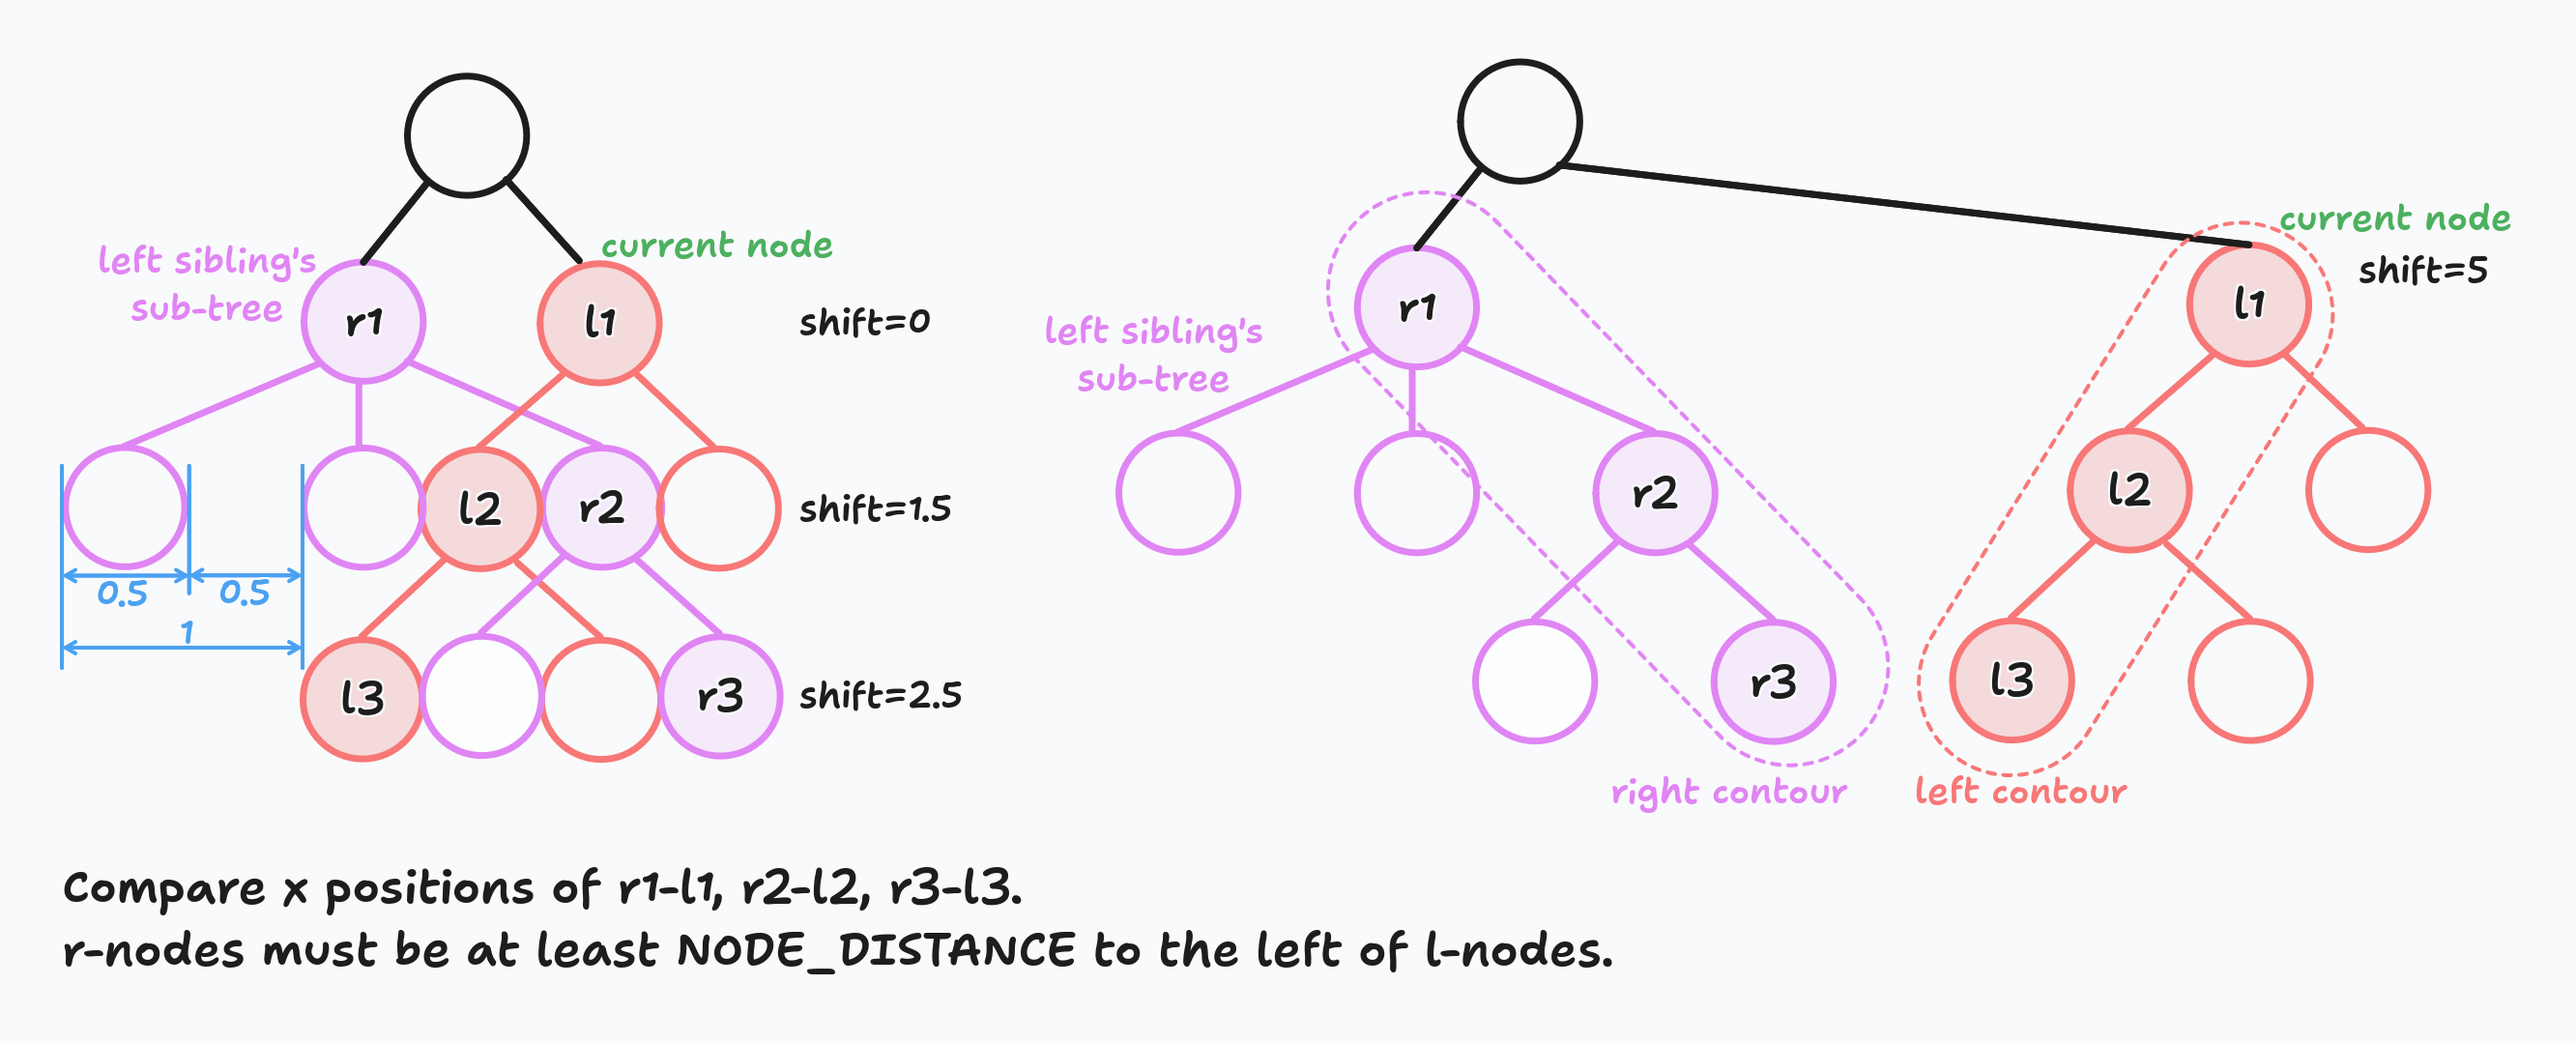
I highlighted the rightmost nodes of the left sub-tree with purple and the leftmost nodes of the current sub-tree with orange. All purple nodes are called the right contour and all orange nodes are called left contour.
We do shift calculation for each not-leftmost node in the tree.
Important moment #1. Pay attention that we compare the leftmost and rightmost nodes on each level. It does not mean that it's enough, for example, for the left contour to just take the leftmost child of the leftmost sibling and so on. Look at the picture below:
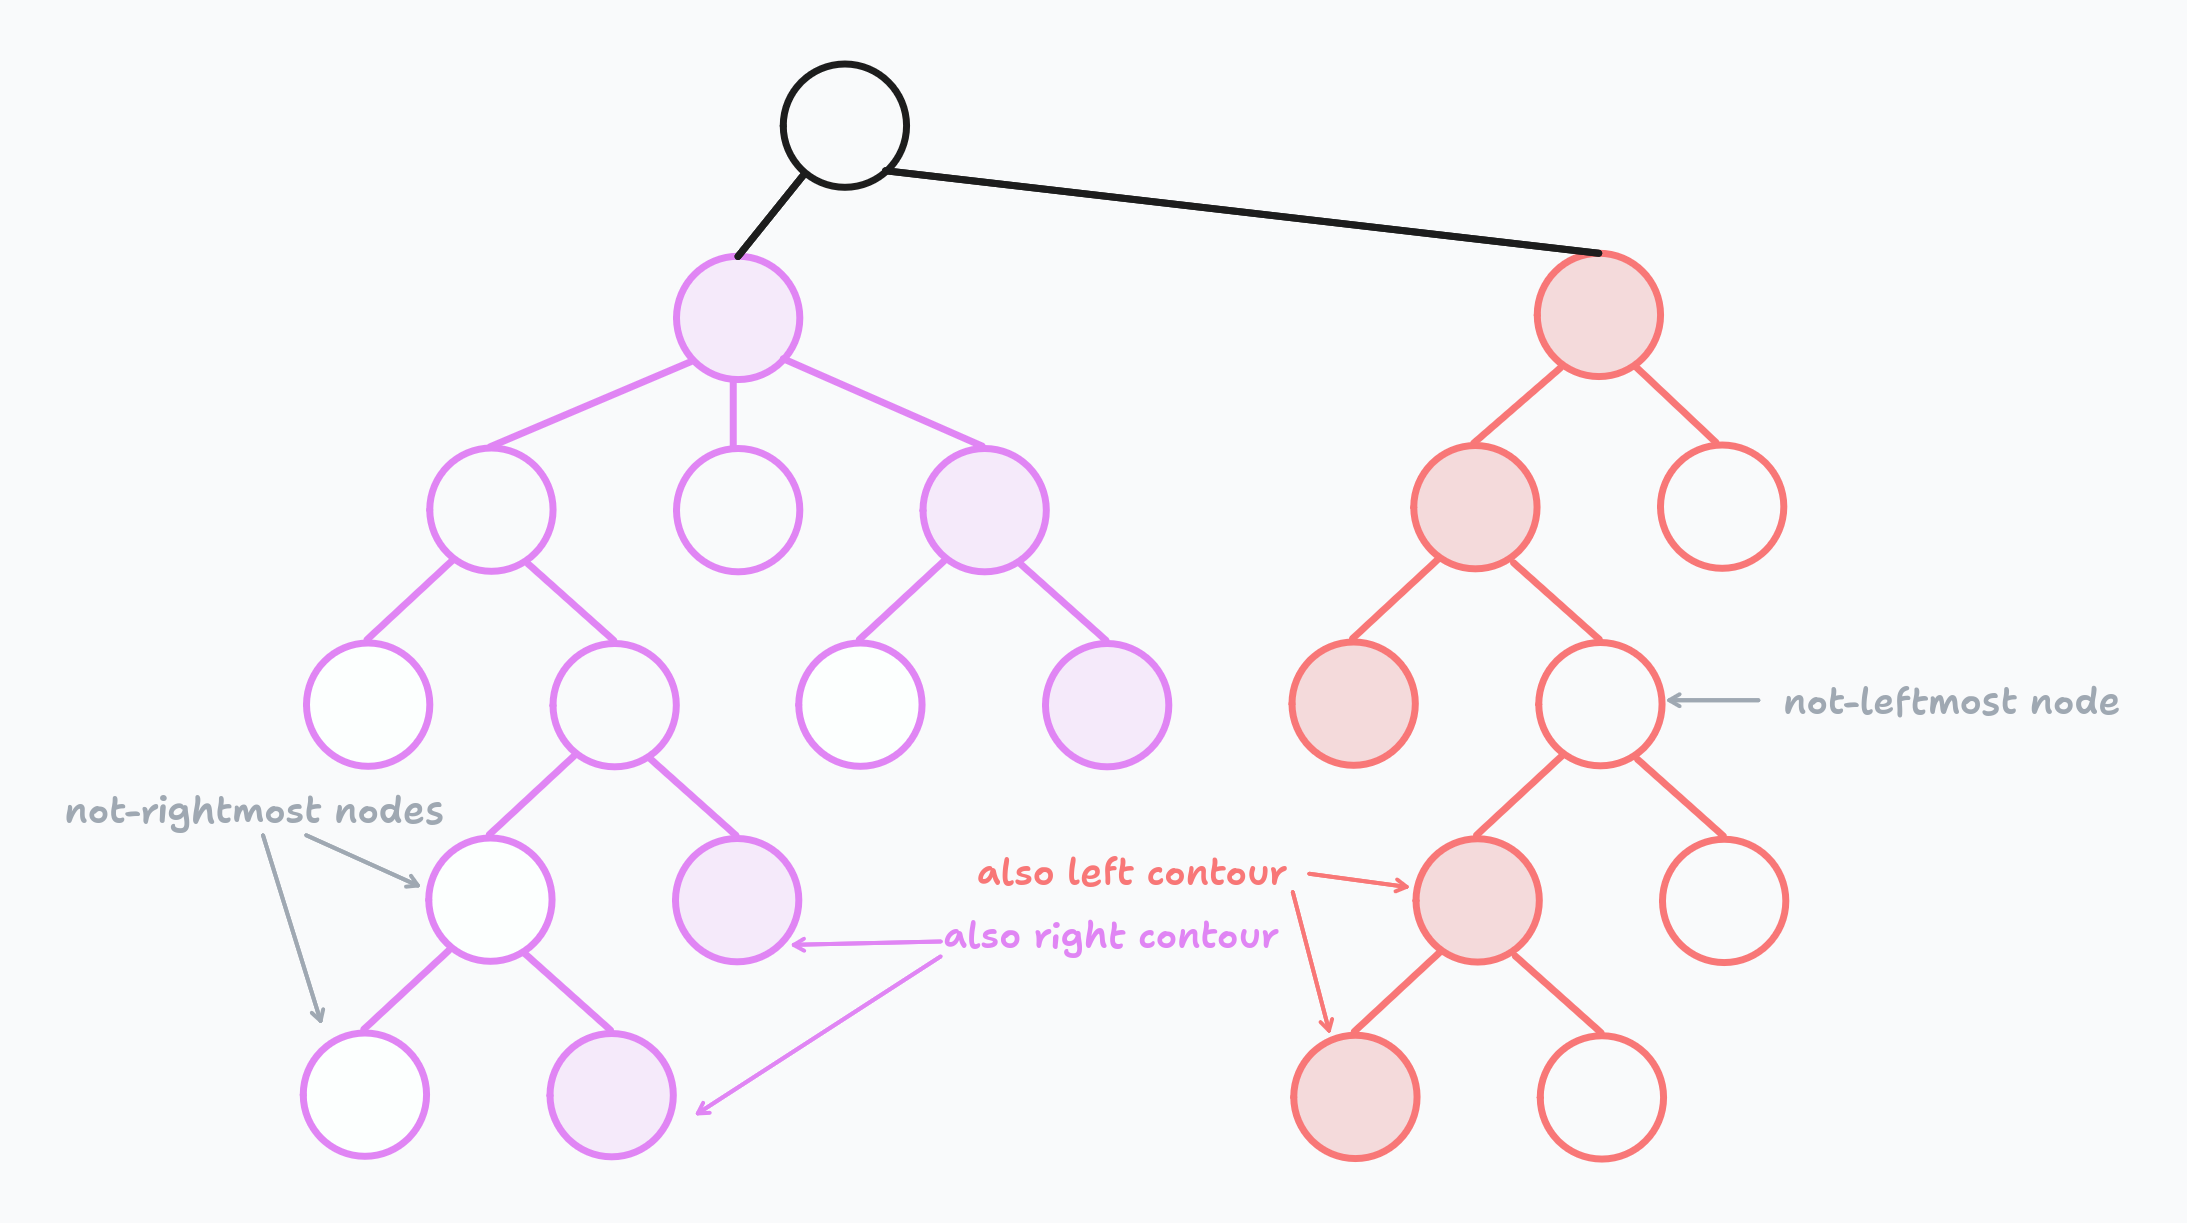
The path to some leftmost/rightmost nodes can lead through intermediate nodes. You need to take it into account when implementing the algorithm. Unfortunately, I forgot about that, and my implementation is incomplete. I remembered about it only while writing this post 😅. And that's another reason to write 🤓.
Important moment #2. Do not forget to apply mod and shift values to child nodes during shift calculation.
Example
Do you remember the big tree from the beginning of the post?
Let's calculate the preX, mod, and shift values for each node.
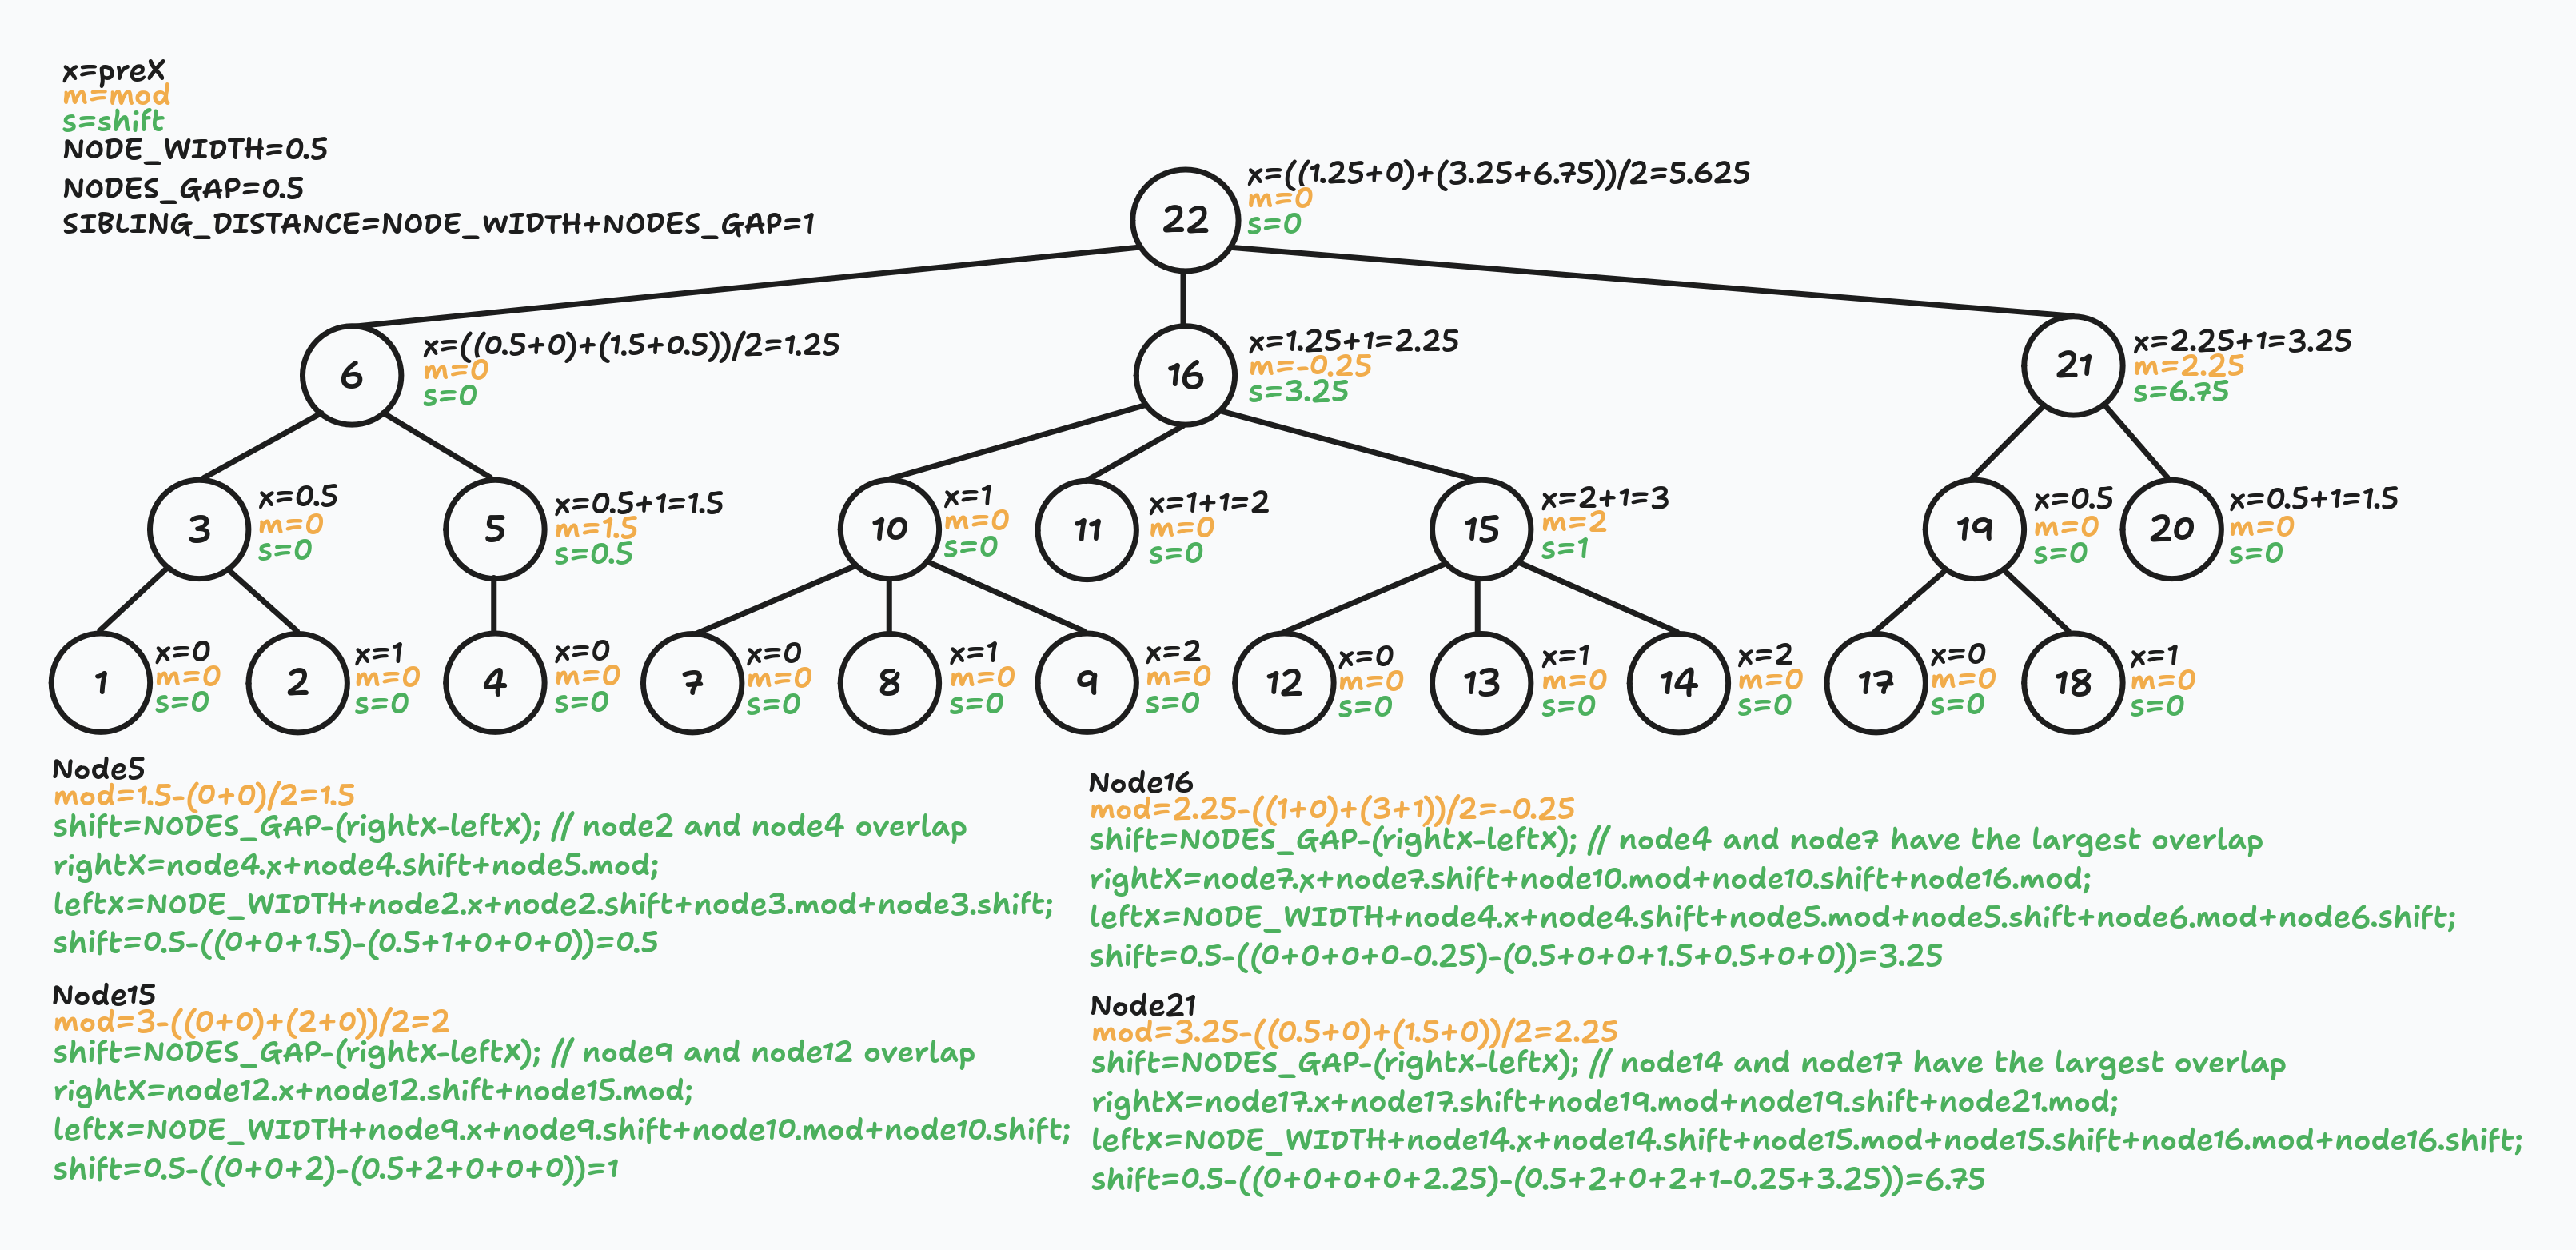
I added verbose explanations on purpose. The good, verbose, and comprehensive example was exactly what I wanted when I first encountered this algorithm.
Did you notice that node11 is not exactly between node10 and node15? That's what I told you at the beginning of the article: I did not care about distances between siblings. The only thing that matters to me is parent-children alignment. But if you want to fix that and get even more ✨aesthetic✨ tree, you can improve the math behind shift calculation.
Second walk
Congratulations! You have gotten through the hardest part. The second walk is much easier and intuitively understandable.
At this point, we have preX, mod, and shift parameters for every node in the tree.
Using the depth-first left-to-right walk, we determine the final x and y coordinates for every node.
For every node, the final x coordinate is the sum of all parent nodes mod and shift values plus its own preX and shift values.
In other words, we need to sum the mod and shift values of every parent node on our way to the node.
const shift = /* the sum of parent nodes mod and shift parameters */;
const x = node.preX + node.shift + shift;
For example, the final x coordinate for node13 is a sum of mod + shift values of nodes22,16,15 and its own x + shift values:
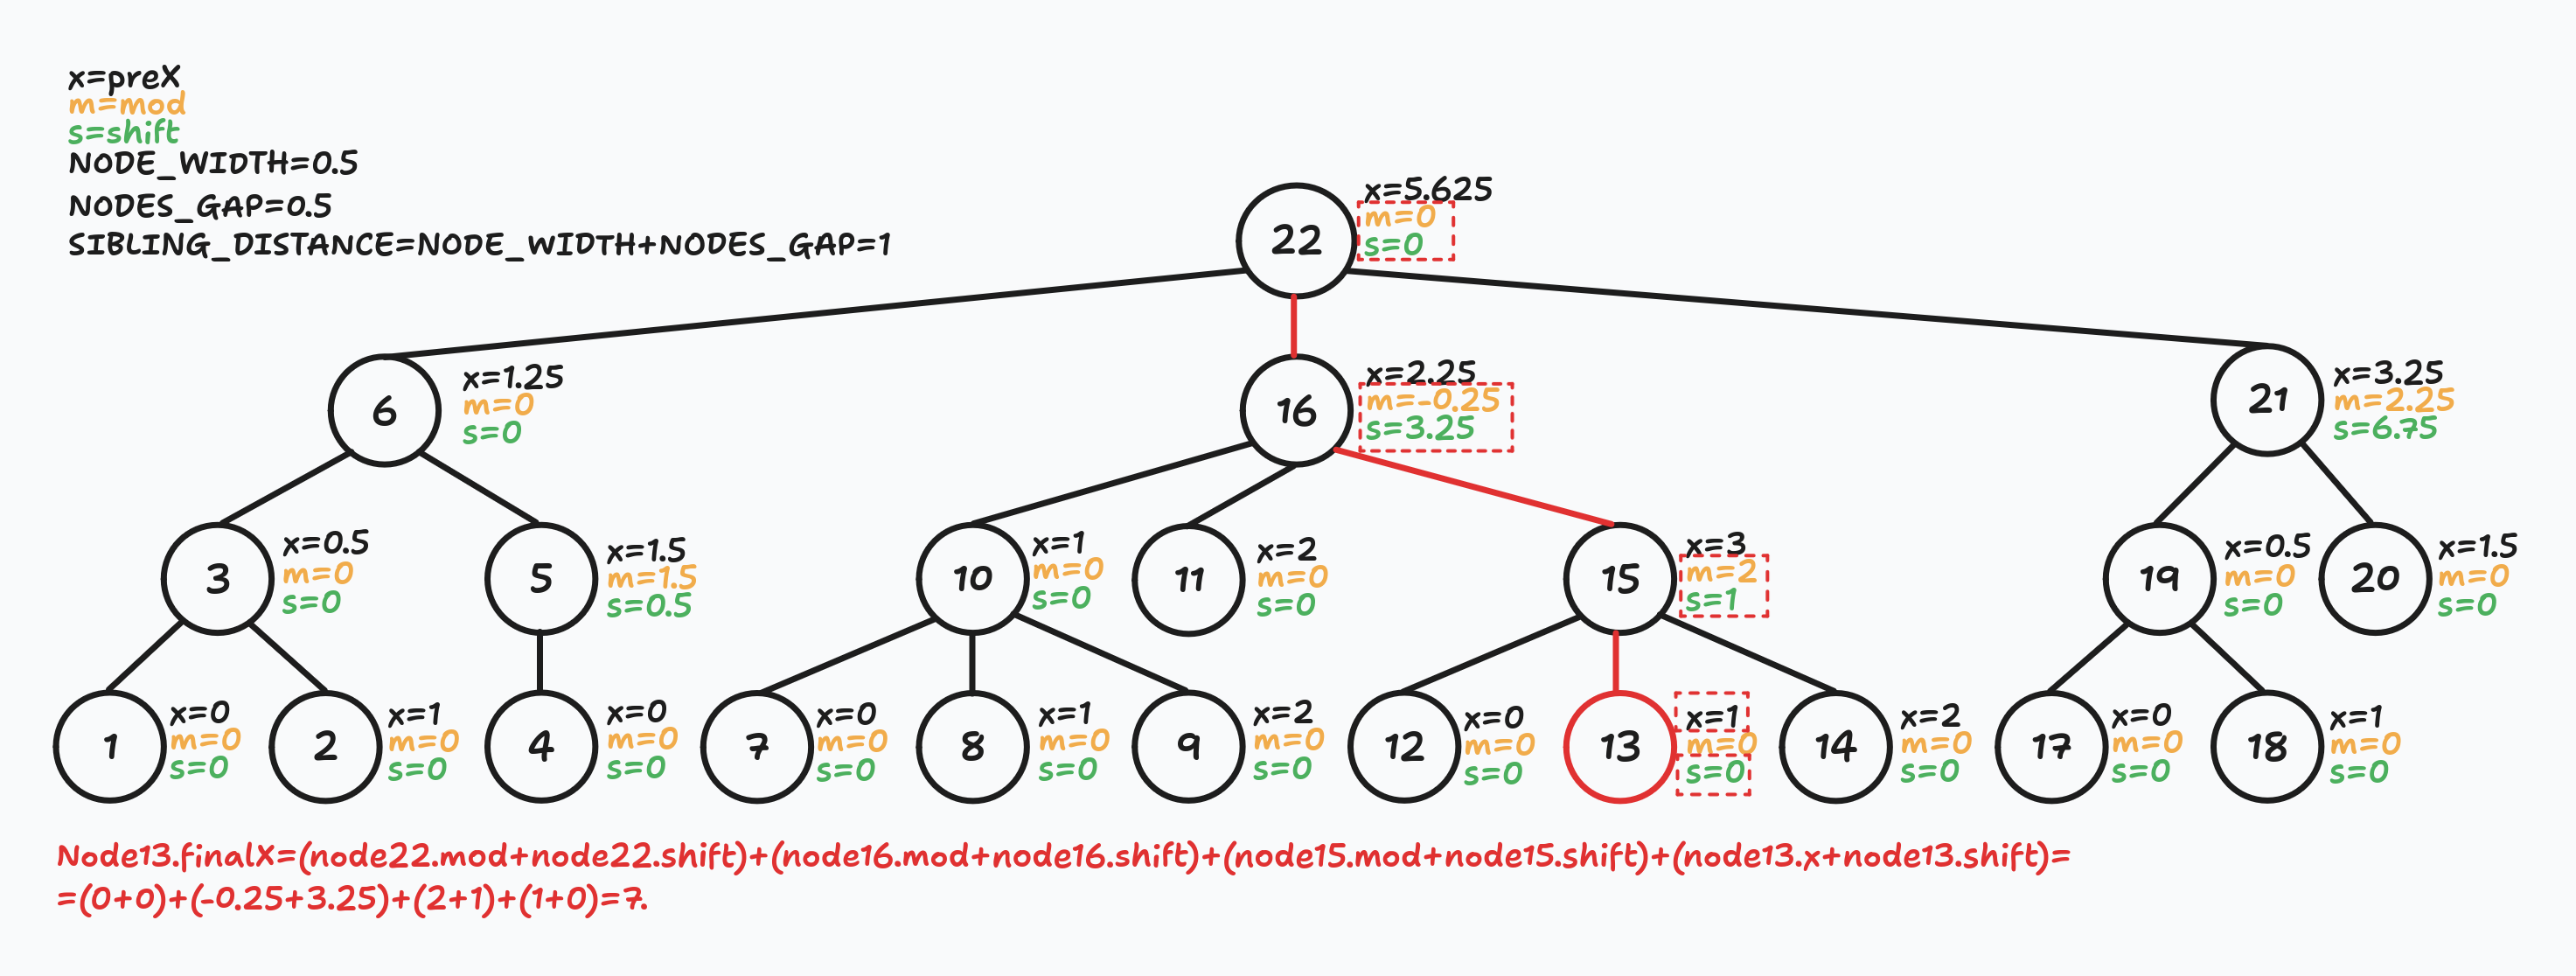
The best part is that we do not even need to create separate arrays/lists to track parent nodes. We can calculate this sum recursively:
// Pseudocode.
function secondWalk(node, shift, level) {
    // `shift` - sum of all parent nodes mod and shift values.
    for (const child in node.getChildNodes()) {
        secondWalk(child, shift + node.mod + node.shift, level + 1);
    }

    const x = node.preX + node.shift + shift;
    const y = level * (NODE_HEIGHT + NODES_GAP);

    // At this point, (x, y) are final node coordinates.
    // Do whatever you need to do with them.
}

secondWalk(root, 0, 0);
Let's apply this to our example and see what we will get:

Demo: Grafily
I hope the reader does not forget that my primary goal is to render family graphs. Obviously, we cannot render all family members but only direct ancestors: parents, parents of parents, etc.
I adjusted the Reingold-Tilford Algorithm to family tree rendering and implemented it in github/TheBestTvarynka/grafily/b9d281d3/src/layout.ts. The whole implementation took me ~500 LoC. This implementation is far from perfection and code can be cleaned a lot. But I do not need any perfectionism here, and I know that I will rewrite it soon.
This is the example of the Reingold-Tilford algorithm in action:
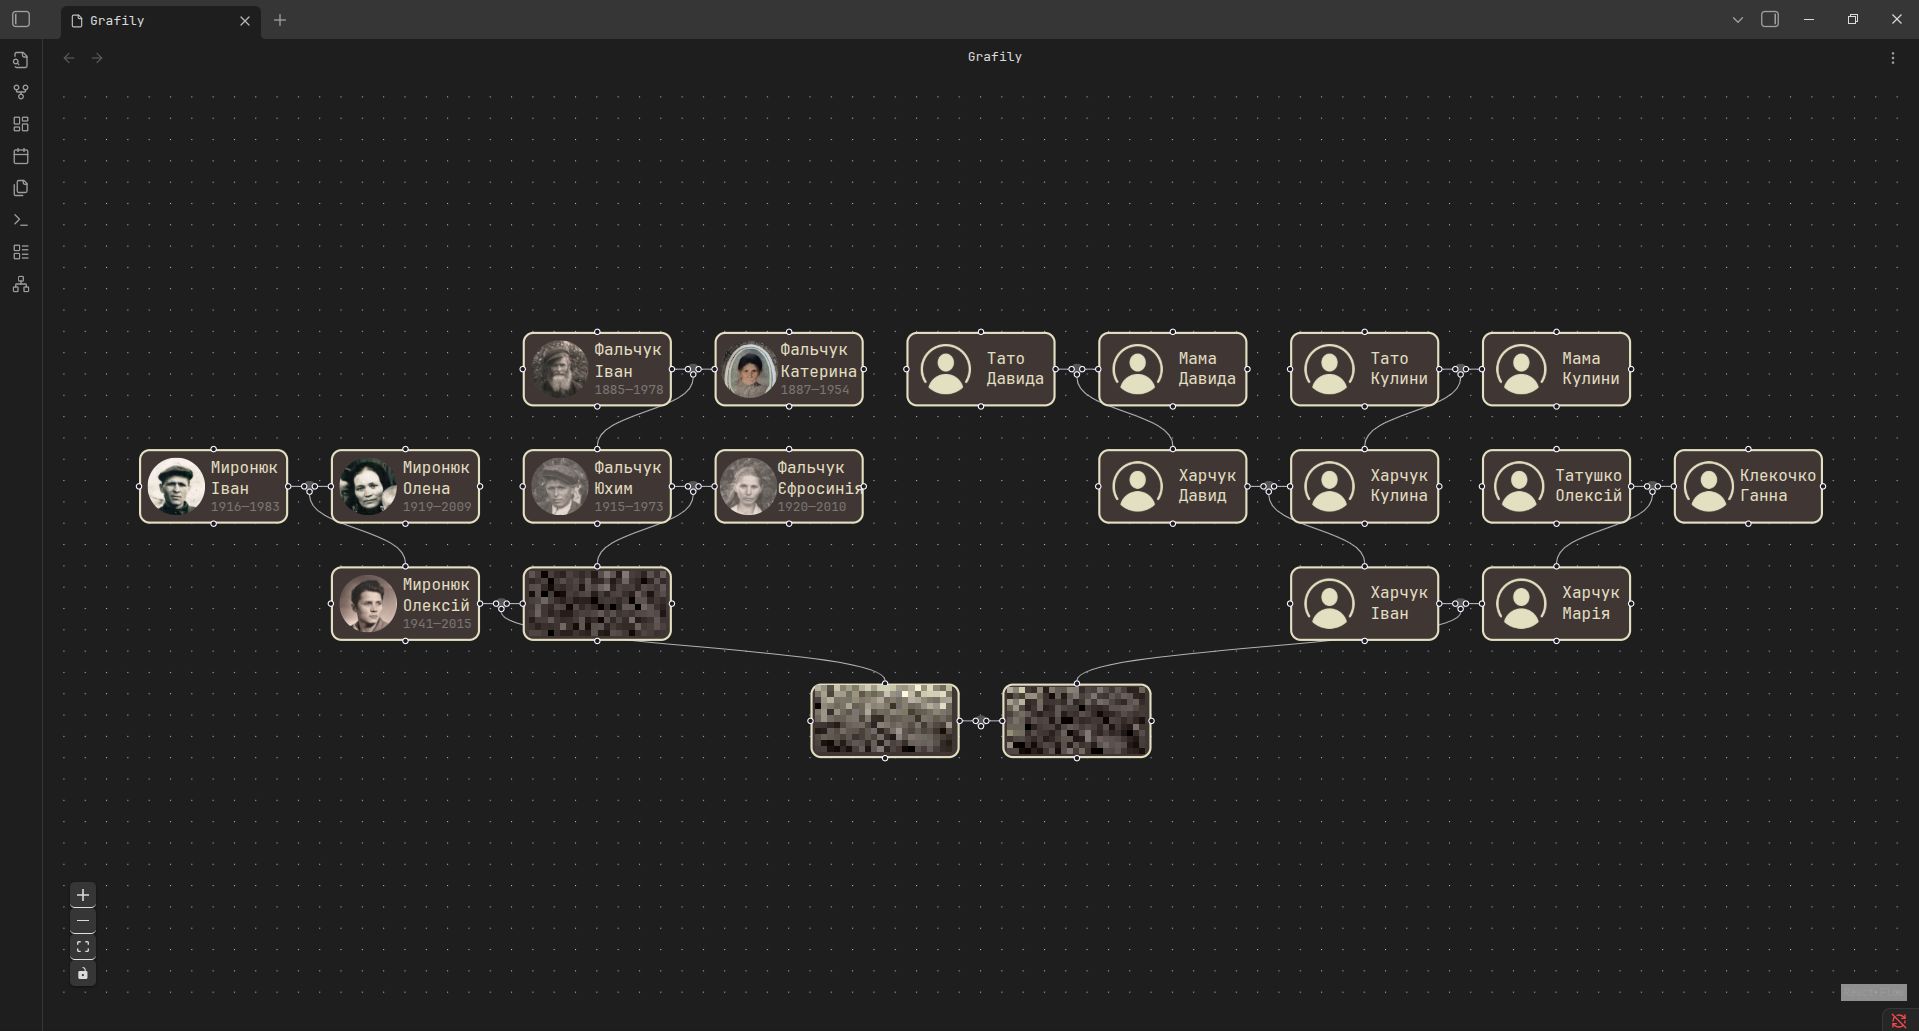
I was too lazy to create a separate vault with non-existent persons, so I just took a small subset of my real ancestors and blurred alive ones 🙃
As you can see from the screenshot above, the algorithm successfully positioned marriages; there are no overlaps and all marriages are aligned. At this point, I can call it a success 🤩 😎.
The main limitation of this approach: only direct ancestors are allowed. I also call it a school-level family tree. It's impossible to render siblings, their spouses, and their spouses' families (I call them parallel families).
I adjusted the Reingold-Tilford Algorithm to family tree rendering...
I did not change the algorithm itself, but added small tricks to the nodes' representation.
-
Every tree note is actually 3 nodes combined together: parent1 node + marriage node + parent2 node. It was done to simplify the implementation of the algorithm and improve edge rendering.
// https://github.com/TheBestTvarynka/grafily/blob/b9d281d35fe5def9a3b0b260c82375d44f4755b1/src/layout.ts#L13-L19 // +------------+ +------------+ // | parent1 |--------------o--------------| parent2 | // +------------+ +------------+ // // | NODE_WIDTH | MARRIAGE_GAP | MARRIAGE_GAP | NODE_WIDTH | // | MARRIAGE_WIDTH | const MARRIAGE_WIDTH = (NODE_WIDTH + MARRIAGE_GAP) * 2; -
I draw a tree with the root at the bottom and leaves on the top of the page. In family trees, it is conventional to draw older generations on top. On the other hand, that's even better because now the tree looks actually like a real tree:

Conclusions
I hope my explanation is pretty clear to you, my dear reader. I did my best to make it easier to understand 😊.
Additionally, I would like to mention that implementing such an algorithm is a great exercise to boost your programming skills. I have not had such algorithmic tasks in years. And when I started writing the Reingold-Tilford Algorithm for my plugin, I felt a small numbness. Most of the time, I looked like this:

The progress was super slow, and I spent a lot of time thinking about how to represent different parts of the algorithm in the code. But in the end, I managed to get it done and am even a bit proud of myself.
References
- A Node-Positioning Algorithm for General Trees. John Q. Walker II. September, 1989. This paper is awful. It was useless for me. I understand a bit more than nothing from it. I mentioned it just for curiosity.
- Tidier Drawings of Trees Edward M. Reingold and John S. Tilford. March 1981. Another related paper just for curiosity and general intellectual development 🤣.
- Reingold Tilford Algorithm Explained With Walkthrough. Sep 12, 2023. Excellent blog post 🤩 — good explanations, nice images, and illustrations. I recommend reading it.
- Drawing Trees Functionally: Reingold and Tilford, 1981. April 22, 2023. Another post with great explanation and even animations 🤩.
- Algorithm for Drawing Trees. April 20, 2014. Another blog post I found, but it was confusing for me and raised more questions than it answered.
- My Reingold-Tilford Algorithm implementation: github/TheBestTvarynka/grafily/b9d281d3/src/layout.ts.
- Obsidian official website.
- myheritage official website.
- tldraw GitHub repository.